In a world where digital invitations are becoming increasingly popular, there is something special about receiving a beautifully crafted, handmade invitation. Personalized and artisanal invites make a statement long before the party even begins, setting the tone and anticipation for the event. A handcrafted invitation offers a unique touch that instantly shows your attention to detail and creativity, leaving a lasting impression on your guests.
Handmade invitations allow you to reflect the theme, mood, and personality of your event in a way that digital designs often cannot. Whether you’re planning a wedding, a birthday, or a themed party, these invites can truly capture the essence of the celebration. Moreover, creating invitations by hand adds a personal, heartfelt element to the event, making your guests feel valued and part of something special.
In this article, we will guide you through the process of making your own unique handmade invitations. You’ll learn about the materials you need, step-by-step instructions, and creative ideas for adding that personal touch to your invites. We’ll also explore different styles, giving you the flexibility to choose what works best for your party. By the end, you’ll be ready to create invitations that will leave your guests excited and impressed.
Materials Needed
Creating beautiful handmade invitations doesn’t require expensive supplies, but it does require a little creativity and some basic materials. Here’s what you’ll need to get started:
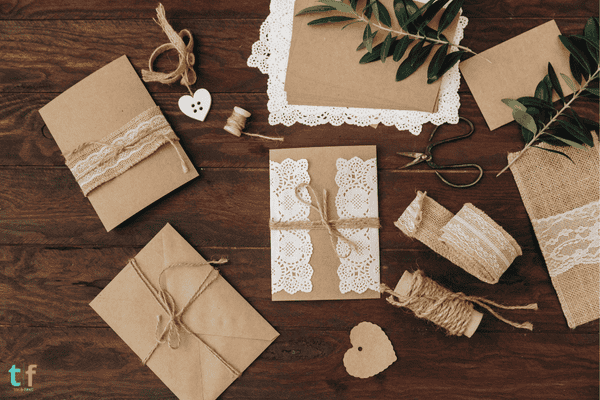
- Paper: Choose paper that complements the theme of your event. Some great options include textured paper, kraft paper, or colored cardstock.
- Inks and Stamps: For printing the text or creating decorative patterns. Stamps in various designs (e.g., floral, vintage) can add a unique touch.
- Adhesives: A strong glue or double-sided tape to hold everything in place.
- Ribbons and String: Perfect for adding a delicate touch of elegance.
- Stickers or Embellishments: Add fun, thematic decorations like flowers, stars, or rhinestones.
- Pens: If you’re using calligraphy or handwritten text, make sure to have a set of quality pens for precise lettering.
Optional materials:
- Dried Flowers: Adds a rustic or romantic touch, ideal for vintage or nature-themed events.
- Fabrics and Lace: Perfect for weddings or other elegant events, adding texture and beauty.
- Buttons: Can give a playful or retro vibe, depending on your theme.
🌸 Step-by-Step Instructions for Creating Handmade Invitations
Step 1: Choosing the Paper and Invitation Format
The first step is selecting the paper that will form the base of your invitation. Consider the theme of your event when choosing the paper. You could opt for textured paper for a more rustic feel, or a sleek, glossy finish for a more modern or formal event. Popular paper types include:
- Textured Paper: Adds depth and sophistication, ideal for elegant or vintage themes.
- Kraft Paper: For a rustic, natural look, perfect for boho, outdoor, or vintage events.
- Colored Cardstock: Use vibrant colors to make the invitation stand out, especially for parties like birthdays or festivals.
Once you’ve chosen the paper, decide on the format. Common options include:
- Rectangular Invitations: Classic and easy to design.
- Square Invitations: Great for a modern or unconventional look.
- Folded Invitations: These provide space for more creative designs and messages inside.
Step 2: Personalizing the Invitation
Now it’s time to add the text and personal touches that make the invitation yours. Begin by selecting a font or handwriting style that reflects the theme of your event. For example:
- Formal Events: Opt for elegant calligraphy or serif fonts to maintain a sophisticated look.
- Casual Parties: Playful fonts or handwritten text can give a more relaxed and fun vibe.
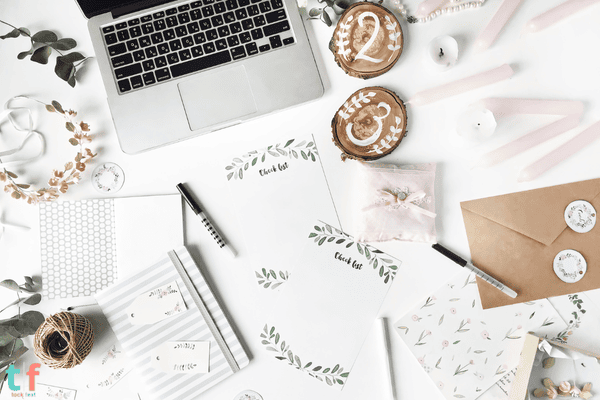
Next, craft your message. Be sure to include essential details like the event date, time, location, and RSVP information. Add a personal message or a meaningful quote to make your invitation more memorable.
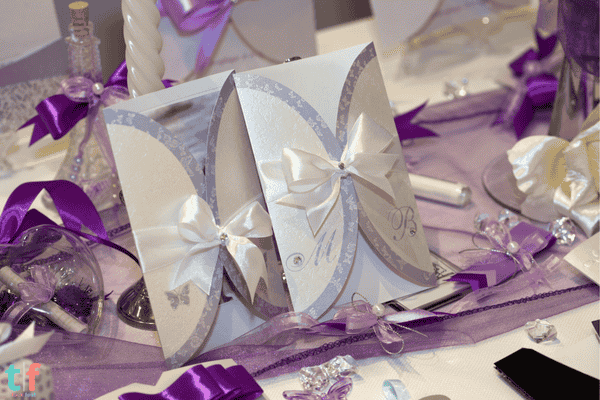
Step 3: Adding Decorative Elements (H2)
Decorative elements are what take your invitation from basic to breathtaking. Consider using:
- Ribbons and Lace: Add a touch of elegance by tying a small ribbon around the invitation or incorporating lace as a border.
- Embellishments: Stickers, rhinestones, or buttons can be used to add texture and visual interest.
- Watercolor or Painted Elements: For a personalized touch, consider adding small painted designs like florals, borders, or even abstract art to the invitation.
These elements should complement the theme of the event, not overpower it. For example, a vintage wedding invitation could include lace and a soft color palette, while a birthday invitation could use bright colors and playful embellishments.
Step 4: Assembling and Finalizing the Invitation
Once all the components are prepared, it’s time to assemble the invitation. Carefully fold, glue, or tape the elements into place. If you’re creating a folded invitation, make sure the folds are crisp and neat.
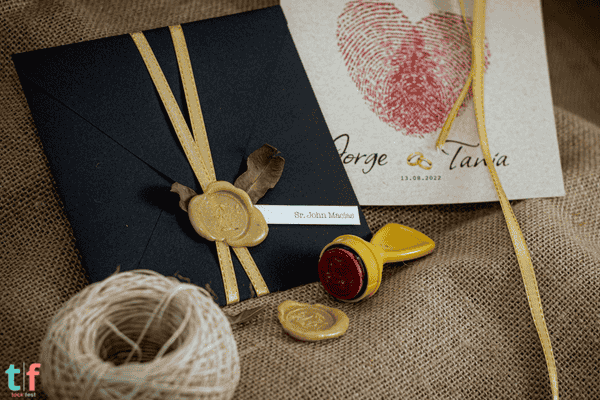
For additional flair, create personalized envelopes to match the invitation. You can decorate the envelope with a ribbon, a wax seal, or a matching sticker. This will give your guests a sneak peek into the special occasion before they even open the envelope.
Step 5: Testing the Presentation
Before sending out your invitations, take a moment to test their presentation. Here are a few things to check:
- Are the elements securely attached? Ensure that everything is glued or taped properly.
- Is the text readable? Check the font size, color, and placement to make sure it’s easy to read.
- Is the invitation balanced? Look at the overall layout and adjust the placement of elements for a harmonious look.
- Are the envelopes the right size? Make sure your invitation fits inside the envelope without being squished or bent.
Once everything is in place, your handmade invitations will be ready to impress your guests.
Tips for Personalization
To make your handmade invitations even more unique, consider adding creative personalizations:
- Calligraphy: Handwritten calligraphy adds a beautiful, authentic touch, especially for weddings or formal events.
- Stamps: Use a custom rubber stamp with your initials, a special date, or a design that ties in with the theme of the event.
- Theme-Based Elements: Incorporate elements from the theme of the party. For example, for a beach party, you could add a seashell design, or for a winter wedding, use snowflake embellishments.
You could also encourage guests to keep the invitation as a memento by designing it in a way that’s both functional and decorative. For example, if your invitation doubles as a keepsake, consider adding a photo frame design or a memorable quote.
Conclusion
Creating handmade invitations is a rewarding DIY project that adds a personal and memorable touch to any event. Not only do they reflect the theme and personality of the celebration, but they also show your guests that you’ve put thought and effort into every detail. From choosing the right materials to adding your creative flair, every step of the process is an opportunity to showcase your unique style.
Now that you know how to make your own beautiful, handcrafted invitations, why not give it a try? Start planning your next event and create invitations that will leave a lasting impression. Don’t forget to share your creations with us in the comments below, and explore more DIY tutorials for crafting your perfect celebration!

Chloe Turner is a specialist in event planning and decoration, focusing on providing creative, practical, and budget-friendly solutions for parties. On TockFest.com, she shares the latest trends, tips, and innovations to help readers turn any celebration into a memorable experience. Chloe is dedicated to offering up-to-date and relevant content, ensuring that her audience has access to the best practices and ideas for creating beautiful, unique parties.